Newborn Editing Before And After For Natural Results
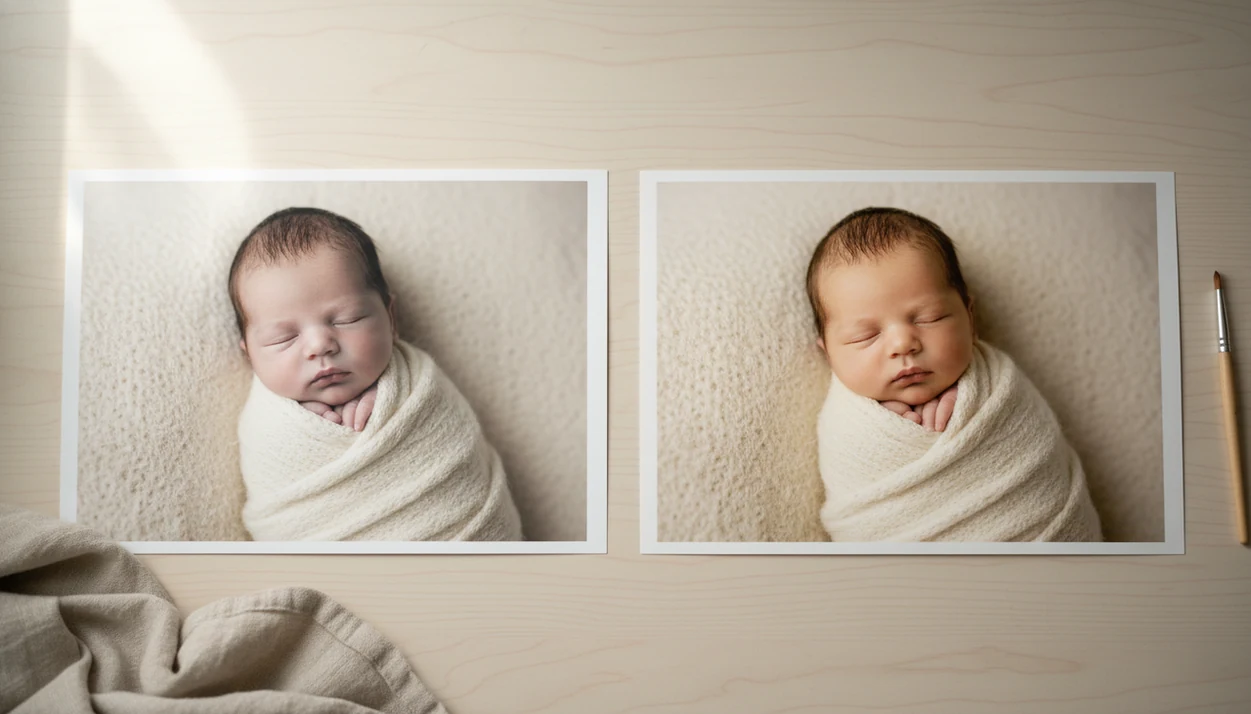
Newborn editing before and after should show gentle, disclosed changes that improve light, color, crop, and temporary cleanup while keeping the baby recognizable. The strongest examples remove distractions without erasing skin texture, birthmarks, facial structure, or the real context of the photo.
> Newborn Photo App is a baby photo contest app that helps parents plan, edit, and share contest-ready newborn photos.
- Natural newborn retouching starts with exposure, white balance, and skin-tone correction before any cleanup.
- Contest-ready edits should usually fix temporary distractions like lint, redness, flaky skin, or background clutter, not reshape the baby.
- Before-and-after examples are most trustworthy when they disclose exactly what was changed.
Newborn Editing Before And After: What Natural Results Mean
Newborn editing before and after means comparing the original baby photo with the polished version so viewers can see exactly what changed. A natural result improves the image without making the baby look like a different baby.
Good newborn retouching examples usually handle temporary issues first: redness, flaky skin, lint, baby acne, tiny scratches, or a diaper sleeve caught in the corner. Heavy airbrushing is different. So are edits that reshape cheeks, change head shape, erase permanent birthmarks, or smooth every pore until the skin looks waxy.
The baby should still look real.
For contest-ready setup work, the edit should preserve facial structure, expression, skin texture, and identity-defining marks. Natural baby photo editing is cleanup and correction, not reinvention.
How Newborn Editing Before And After Works
Newborn editing before and after works by using the original image as the truth check, then judging every change against it. The “before” photo is the baseline: it shows the baby’s real features, skin texture, expression, and setting before presentation improvements begin.
Most edits fall into two groups. Global edits affect the whole frame, such as exposure for brightness, crop for framing, contrast for depth, white balance for believable color, and tone for the overall mood. Local edits affect only selected areas. These include healing a tiny scratch, masking one patch of redness, cloning out blanket lint, or making a selective color change to reduce a strong cast on hands or feet.
A simple review order keeps the edit honest:
- Compare the edited photo with the original baby, not with a trend image.
- Check global changes first so the whole photo still feels believable.
- Inspect local cleanup for repeated texture, smears, or missing real details.
- Confirm that identity, facial structure, marks, and expression still match.
Natural editing improves how the photo is presented. It should not change who the baby appears to be.
Baby Photo Before After Edits In A Contest-Ready Workflow
Baby photo before after edits work best in a fixed order: correct the whole photo first, then clean small distractions. Jumping straight to skin retouching often makes the final image look uneven.
- Set exposure and crop. Brighten the image gently, straighten the frame, and crop for the entry form before touching skin.
- Correct white balance. Remove yellow nursery light or blue shadow so the baby’s skin tone looks believable.
- Balance color and skin tone. Reduce strong red, orange, or purple casts without flattening natural variation.
- Clean selectively. Soften flakes, small scratches, lint, and blanket distractions with a light hand.
- Check realism. Compare the edit beside the original at full size and phone size.
- Write a disclosure note. Save a short note before posting, especially if the image enters a contest.
The awkward square crop box on some entry forms can cut off a bonnet or grandparent’s hand. Crop early, not after cleanup. For phone-specific editing order, the guide on how to edit baby contest photos with phone goes deeper.
Natural Baby Photo Editing Tools Behind The Scenes
Natural baby photo editing works through global adjustments and local adjustments. Global adjustments change the whole image: exposure, contrast, white balance, shadows, and highlights. Local adjustments affect selected areas with a brush, mask, healing tool, clone tool, or selective color correction.
The plain-language version is simple. First, fix the light. Then fix only the parts that distract.
Skin texture matters because newborn skin has fine pores, flakes, creases, and soft color changes. If an editor removes all texture, the baby can start to look plastic or computer-made. That is usually the point where a natural edit has gone too far.
AI-assisted editing can speed up masking, cleanup, and color suggestions, but it still needs human review. A preview may remove a forehead wrinkle in soft light, or turn skin into one smooth peach patch. Reject that. Tools like Newborn Photo App, Canva, and BabyPics can support a workflow, but the final judgment should stay with a parent or editor checking the real baby’s appearance.
Six Steps For Using Newborn Retouching Examples Without Overediting
Newborn retouching examples are useful when you study the problem, not just the polished look. Copying a dramatic slider recipe onto a different baby photo can make skin tones worse.
- Identify the original problem. Name the issue first, such as yellow light, blanket lint, flaky skin, or a distracting edge.
- Match the edit to the issue. Use exposure for darkness, white balance for color cast, and healing for small temporary marks.
- Protect skin texture. Zoom out and confirm that pores, creases, and soft shadows still exist.
- Compare at entry size. Check the edited version in the same crop and size used by the contest or social platform.
- Pause before removing features. Keep birthmarks, facial structure, body shape, and identity-defining details unless there is a clear reason.
- Write the disclosure. Note changes such as “light/color corrected” or “temporary flakes softened.”
Good newborn and baby photo contest ideas, photography tips, milestone shoots, and AI newborn photo inspiration deliver safer planning and clearer creative choices, not permission to disguise who the baby is.
Five Newborn Retouching Examples Parents Can Compare
- Yellow indoor light to neutral skin tone: The edit cools a warm room cast and balances white areas, but the baby’s natural blush and shadows stay visible.
- Red or purple hands and feet softened: The edit reduces strong color in small areas, but it does not erase normal variation or make every limb the same shade.
- Flaky skin and small scratches reduced: The edit softens temporary texture on cheeks, forehead, or hands, but some real newborn skin detail remains.
- Blanket lint and background clutter removed: The edit clears lint, stray threads, or a pacifier tucked under a burp cloth, but it does not invent a false setting.
- Crop tightened for a contest entry: The edit centers the face, removes empty edges, and protects the subject, but it avoids cutting off meaningful hands or props.
For parents, exposure and white balance are often easier to fix than heavy retouching because they improve the whole photo before detail work begins. A wrinkled muslin swaddle can stay. It often looks more honest than a over-polished blanket.
Natural Baby Photo Editing Choices: Acceptable Versus Questionable
Natural baby photo editing is usually contest-safe when it improves clarity without changing identity. Questionable editing starts when the photo hides important truth or creates a scene that did not exist.
| Editing choice | Usually acceptable | Questionable without clear disclosure |
|---|---|---|
| Light | Exposure, shadows, highlights, gentle contrast | Making a dim unsafe setup look bright and supervised |
| Color | White balance and skin-tone correction | Recoloring skin so strongly that it misrepresents the baby |
| Skin | Gentle redness reduction and temporary blemish softening | Removing permanent birthmarks without disclosure |
| Cleanup | Lint, flakes, small blanket distractions | Removing medical-context details to imply a different situation |
| Shape | Minor crop and framing | Changing body shape, head shape, or facial structure |
| Props | Real props already in the frame | Fake props, misleading composites, or undisclosed AI additions |
Official rules and audience expectations should guide disclosure. If a contest asks for minimal editing, a family-album choice may not be acceptable there. Parents who compare apps can start with a best newborn photo editing app guide, then check each platform’s editing limits.
For rashes, unusual coloring, swelling, or other health-looking details, treat the image as a photo issue only; medical interpretation belongs with a pediatrician, not an editing caption (American Academy of Pediatrics: https://www.healthychildren.org/English/ages-stages/baby/Pages/default.aspx).
Four Common Myths About Newborn Editing Before And After Photos
- Myth 1: Newborn editing means making the baby look perfect. Ethical newborn editing usually softens temporary distractions, not every crease, flake, or color shift.
- Myth 2: Dramatic before-and-after images are always better. A subtle edit can be stronger because it keeps the baby recognizable and avoids a staged, plastic finish.
- Myth 3: AI can replace human judgment. AI can suggest masks, cleanup, or color changes, but a caregiver or editor still needs to review realism, safety context, and disclosure.
- Myth 4: Contest photos can hide anything if they look good. Undisclosed edits can mislead judges or viewers, especially if rules expect a natural photo.
Subtlety wins more trust.
A soft side light from a patio door may need only a small shadow lift and a crop. If the edit calls attention to itself before the baby, it is probably doing too much. For AI idea planning, a tool that can make AI newborn photo ideas should be treated as inspiration, not a replacement for real review.
Disclosure Notes For Baby Photo Before After Edits
Do edited baby photos need a disclosure note? In contests, portfolios, and public posts, a short disclosure builds trust because it tells viewers what is real, what was cleaned up, and what was created or removed.
Simple wording works:
- “Light and color corrected.”
- “Temporary skin flakes softened.”
- “Blanket lint and background distractions removed.”
- “Cropped for the entry form.”
- “Composite image, created from multiple photos.”
- “AI-assisted background preview used, final image reviewed manually.”
A stronger disclosure is needed when the edit uses composites, AI-generated props, major object removal, or a background that was not present. Family photography also intersects with real infant health contexts: CDC birth data report that preterm birth and low birthweight affect a meaningful share of U.S. newborns, so editors should avoid interpreting skin color, size, or medical-looking details from a photo (CDC: https://www.cdc.gov/nchs/fastats/births.htm).
Before posting, many parents save screenshots of Instagram contest rules. Pair that habit with a baby photo contest privacy checklist.
Limitations
Before-and-after galleries can teach editing judgment, but they cannot promise the same result on every newborn photo. The original capture matters more than most sliders.
- Lighting and original image quality strongly affect the final edit.
- Editing cannot truthfully fix every skin tone, pose, or medical-looking detail.
- AI may over-smooth skin, flatten detail, invent texture, or miss tiny identity details.
- Some edits can mislead contest judges or viewers if they are not disclosed.
- Permanent features, body shape, head shape, and identity-defining marks should not be changed casually.
- Before-and-after examples are not medical guidance and should not interpret health concerns.
- Contest rules may prohibit edits that feel acceptable for a family album.
- A blurry startle reflex shot may stay blurry, even after sharpening.
Clinicians typically handle health interpretation, while photo editors should limit themselves to visual correction and honest presentation. NPC can help organize contest-ready newborn photos, but no app can make every capture fair, safe, or rule-compliant.
FAQ
What is newborn photo editing?
Newborn photo editing is the process of adjusting light, color, crop, and small distractions in baby photos. It can include gentle cleanup of temporary flakes, lint, redness, or background clutter.
Are newborn before-and-after edits ethical?
Newborn before-and-after edits are ethical when they are natural, disclosed when relevant, and do not misrepresent the baby. They become questionable when they change identity, body shape, or important context.
Should birthmarks be edited out of newborn photos?
Permanent birthmarks should usually be preserved in newborn photos. If parents specifically request removal, the edit should be handled carefully and disclosed when relevant to a contest or portfolio.
How much skin smoothing is too much on a baby photo?
Skin smoothing is too much when pores, creases, flakes, and natural texture disappear. The baby should not look plastic or computer-generated.
Can AI edit newborn photos naturally?
AI can assist with newborn photo editing by speeding up masks, cleanup, and color suggestions. Human review is still needed for realism, identity preservation, and disclosure.
What newborn photo edits are contest-safe?
Common contest-safe edits include exposure correction, white balance, minor crop, lint cleanup, and softening temporary blemishes. Always check official rules before submitting.
Do edited baby photos need a disclosure note?
A disclosure note is useful for contests, portfolios, composites, AI-assisted edits, and major cleanup. Simple notes like “light/color corrected” or “background distractions removed” are often enough.
Why do newborn photos look red or purple?
Newborn photos can look red or purple because of lighting, camera white balance, shadows, and natural skin color variation. Correct the color gently and avoid making medical interpretations from a photo.